Gutter aprons are an essential component of any roofing system. They are designed to help divert water away from the roof and protect the underlying structure from water damage. However, many homeowners are not aware of how to properly install and use gutter aprons. This lack of knowledge can lead to serious problems and expense in the long run.
In this blog post, we will provide a comprehensive guide on how to use a gutter apron. Our team of roofing experts will explain what gutter aprons are, their functions, and how to install them efficiently. We will also discuss the benefits of using gutter aprons and how they can help prevent common roofing problems such as leaks and water damage.
Whether you are a homeowner or a roofing contractor, understanding how to use a gutter apron can save you time, money, and stress in the long run. With our step-by-step guide, you will learn the proper techniques for installing a gutter apron and ensuring its effectiveness in protecting your roof.
1. Gutter aprons prevent water damage.
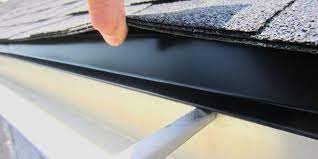
Gutter aprons are a crucial component of any well-functioning gutter system. A gutter apron is a narrow strip of metal flashing, typically made of aluminum or steel, that is installed under the edge of the roof and over the top of the gutter.
The purpose of the gutter apron is to prevent water from seeping behind the gutter and causing damage to the roof’s fascia boards, sheathing, and eaves. By directing water into the gutter system, gutter aprons help to prevent water damage to your home’s foundation and landscaping. Installing a gutter apron is an easy and cost-effective way to protect your home from water damage and extend the life of your gutter system. In this guide, we will walk you through how to properly install and use a gutter apron to ensure long-lasting protection for your home.
2. Start by measuring the roof.
If you’re planning to install a gutter apron, it’s important to start by accurately measuring your roof. This will help you determine the amount of materials needed and ensure a proper fit for your gutter system. To measure your roof, begin by calculating the length and width of each section.
Measure the length of each horizontal edge and add them together to get the total length. Next, measure the height of each vertical edge and multiply by the corresponding width to get the total area. Remember to account for any overhangs or other irregularities in your measurement. Once you have accurate measurements, you can use them to determine the amount of gutter apron needed for your project and ensure a successful installation.
3. Install the roof underlayment.
Installing a roof underlayment is an essential step in ensuring the longevity and durability of your roofing system. To begin the installation process, start by cleaning and preparing the surface of the roof. Next, lay out the underlayment in sections, making sure to overlap each layer by a few inches to prevent any leaks or water damage. Use roofing nails or staples to secure the underlayment to the roof, ensuring that each nail or staple is placed at least 6 inches apart. Be sure to avoid any wrinkles or creases in the underlayment, as these can lead to weak spots in your roof and potential damage down the line. By taking the time to properly install the roof underlayment, you can ensure that your roofing system is well-protected and able to withstand the elements for years to come.
4. Attach the gutter apron.
Attaching a gutter apron is an important step in properly installing a gutter system. In order to attach the gutter apron, you will first need to ensure that the fascia board is clean and free of any debris or old caulk. Next, position the apron along the length of the fascia board, making sure it is flush and level. Once the apron is in place, use roofing nails or screws to attach it to the fascia board, spacing them approximately 6 to 8 inches apart.
It is important to make sure the nails or screws are driven in at a slight downward angle to ensure a secure fit. Finally, be sure to overlap the ends of the apron by at least 2 inches to prevent any water from seeping through the seams. By following these steps, you can ensure that the gutter apron is properly attach and will provide effective protection against water damage.
5. Secure with roofing nails.
A gutter apron is an essential component in any roofing system. It helps prevent water from seeping behind the gutter and causing damage to the fascia board. To ensure that your gutter apron functions effectively, it is crucial to secure it properly with roofing nails. When installing a gutter apron, make sure to place it under the roofing material and extend it over the gutter. Next, hold it firmly in place and hammer in roofing nails every 6-8 inches along the length of the apron. This will help secure it firmly to the roof and prevent it from shifting or coming loose over time. It is important to note that the type of roofing nail used should match the roofing material to ensure a secure and long-lasting installation. By following these simple steps, you can ensure that your gutter apron is install correctly and will provide reliable protection for your home’s roofing system.
Read More – Do you need both a drip edge and gutter apron?
In conclusion, using a gutter apron is a smart and effective way to protect your home from water damage. It is a simple addition to your gutter system that can make a big difference in the long run. By following the proper installation steps and ensuring that the apron is securely in place, you can have peace of mind that your home is well-protect. Whether you are a professional contractor or a DIY homeowner, understanding how to use a gutter apron is an important skill to have for maintaining the overall health and safety of your property.


